cnMaestro - Best Practice AP Group
Purpose:
This guide is to demonstrate setting up an AP group for Cambium Enterprise APs using best practices.
Pre-Requisites:
- Have a cnMaestro account set up (Essentials or X)
- Create a WLAN
Best Practice Guide:
Step 1:
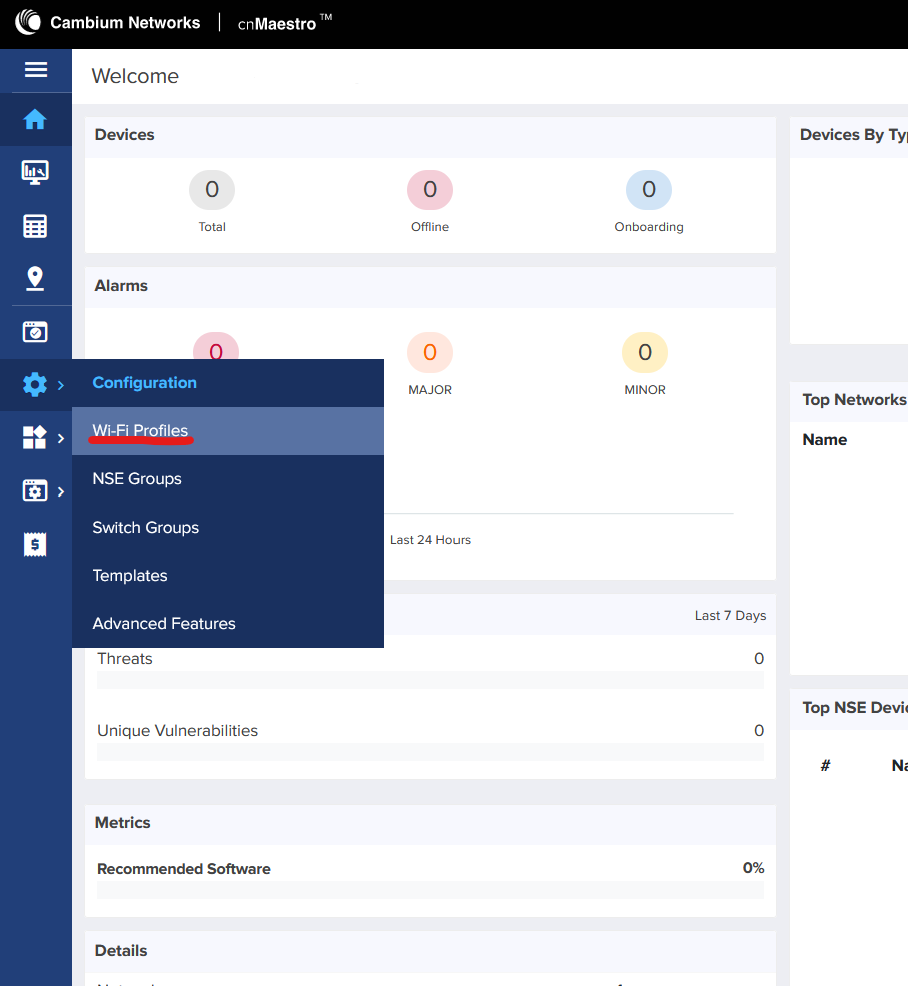
On the menu bar on the left-hand side of the page, hover the mouse over the configuration cog icon and click on Wi-Fi Profiles at the top of the menu.
Step 2:
Ensure you are on the first tab titled 'AP Groups'. Select the 'Add' button on the right hand side of the page.
Step 3: Basic
You will now be shown the AP Group configuration page, starting with the Basic settings. On this page you will need to configure the following:
Type: This will need to be set to 'Enterprise Wi-Fi (E-Series, XE/XV-Series)' for the Cambium enterprise APs.
Name: This will be the name you want to call the AP group. E.G. Office APs.
Auto Sync: This box should be ticked. This will mean any configuration changes will be automatically pushed out to any AP which is using this AP Group.
Country: The country will need to be set to the country the APs are being installed in. E.g. United Kingdom
Placement: This should be set to either indoors or outdoors depending on where the APs are being mounted.
WLAN: In the WLAN table at the bottom of the page hit add WLAN and a list of created WLANs will pop up. Here select the WLAN or WLANs you wish to be broadcasted from the APs that are in this AP-Group.
Everything else on this page can be left as default.
Step 4: Management
The next step is the management section. Here you will need to configure the following:
Administrator Access
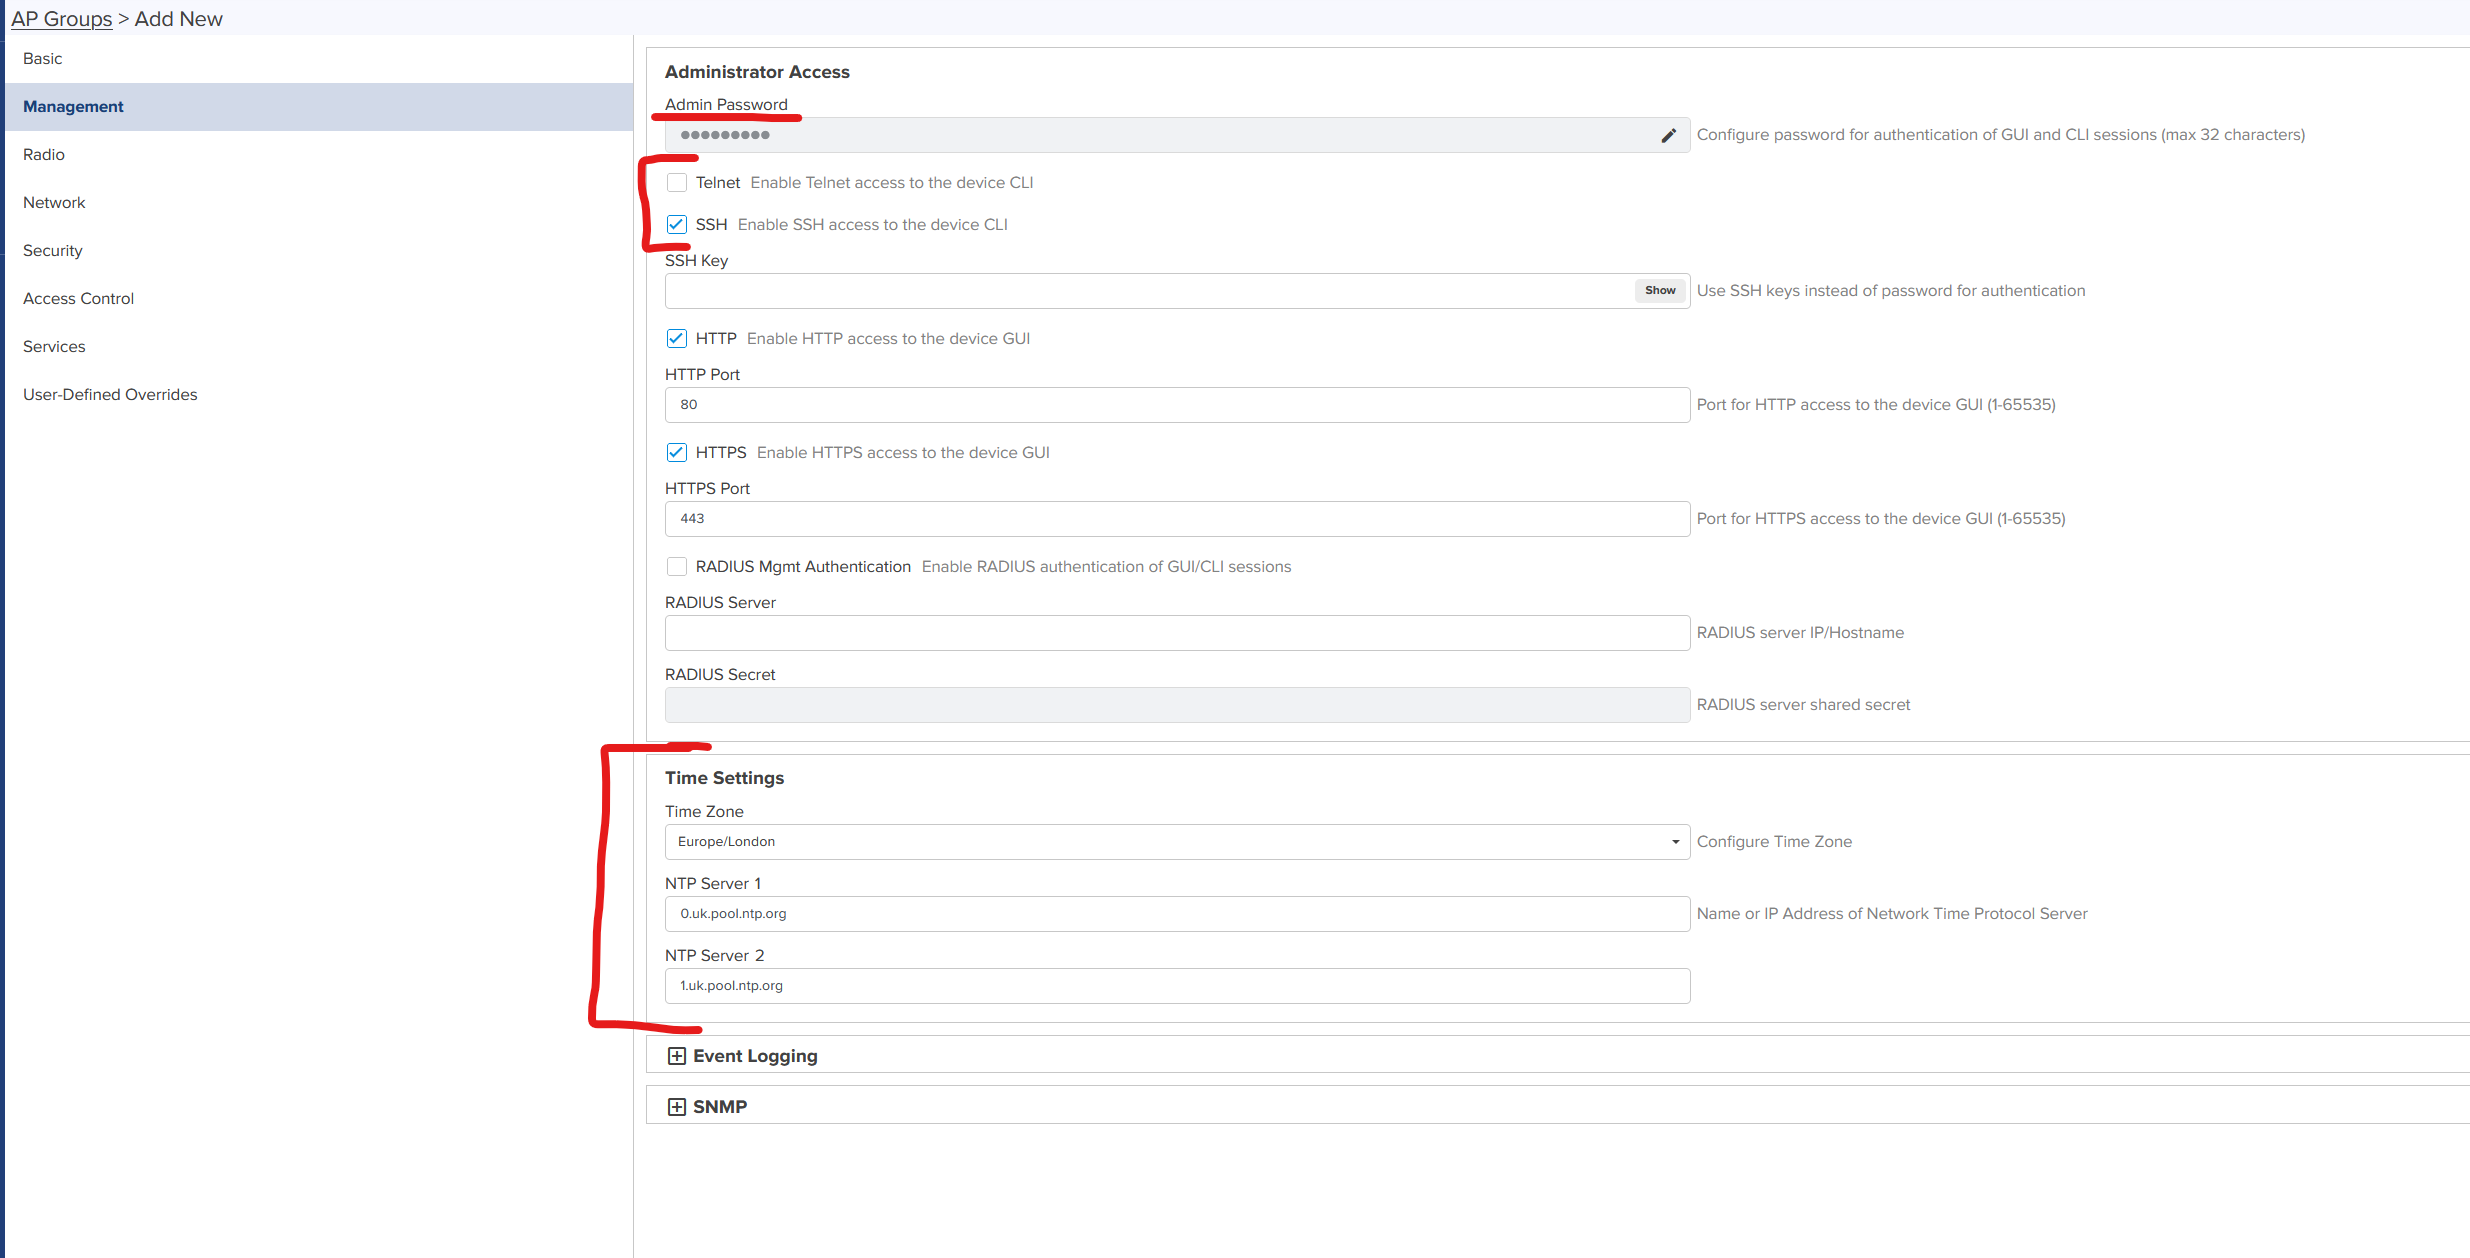
Admin Password: An admin password is required to be set before you can save the settings. This password is to log into the GUI and CLI of any APs which are managed by this group.
Telnet & SSH: Telnet should not be enable as it is less secure. SSH is the most secure method to access the CLI, this should be enabled.
Time Settings
Time Zone: This should be set to the time zone the AP is installed in. The AP requires to have the correct time for certain features to work with clients. In this case it is Europe/London.
NTP Server 1 & 2: Here you can add the Name or IP address of an Network Time Protocol Server. This can either be your own or if you don't have your own you can use one based in the country the AP is installed in. E.g. 0.uk.pool.ntp.org , 1.uk.pool.ntp.org
Everything else can be left as default.
Hit save at the bottom of the page.
Step 5: Radio Settings
The next step is the radio configuration. 2.4GHz, 5GHz and 6GHz all need to be configured to best practice. Here you will need to to configure the following:
2.4GHz
Candidates Channel: For 2.4GHz the Candidates Channel has a drop down menu, this needs to be set to specific. Then in the box next to this 1,6,11 needs to be written in. This will force the 2.4GHz radio to only use the 3 non-overlapping channels - Channel 1, Channel 6 and Channel 11.
Channel Width: This needs to be set to 20MHz. (40MHz channel in 2.4 should never be used as this will reduce the useable channels further).
Transmit Power: For best practice this is set to Auto.
Minimum Unicast Rate: This defaults to 1 but should be set to 12. This will mean clients that drop below the data rate of 12Mbps will roam to another nearby access point. This helps to stop clients slowing the network down that are transmitting at a low data.
Airtime Fairness: This should be enabled. It allows newer clients (802.11n, ac & ax) to transmit first as they can complete their transmissions in a much quicker time than legacy clients, so are given the right of way.
5GHz
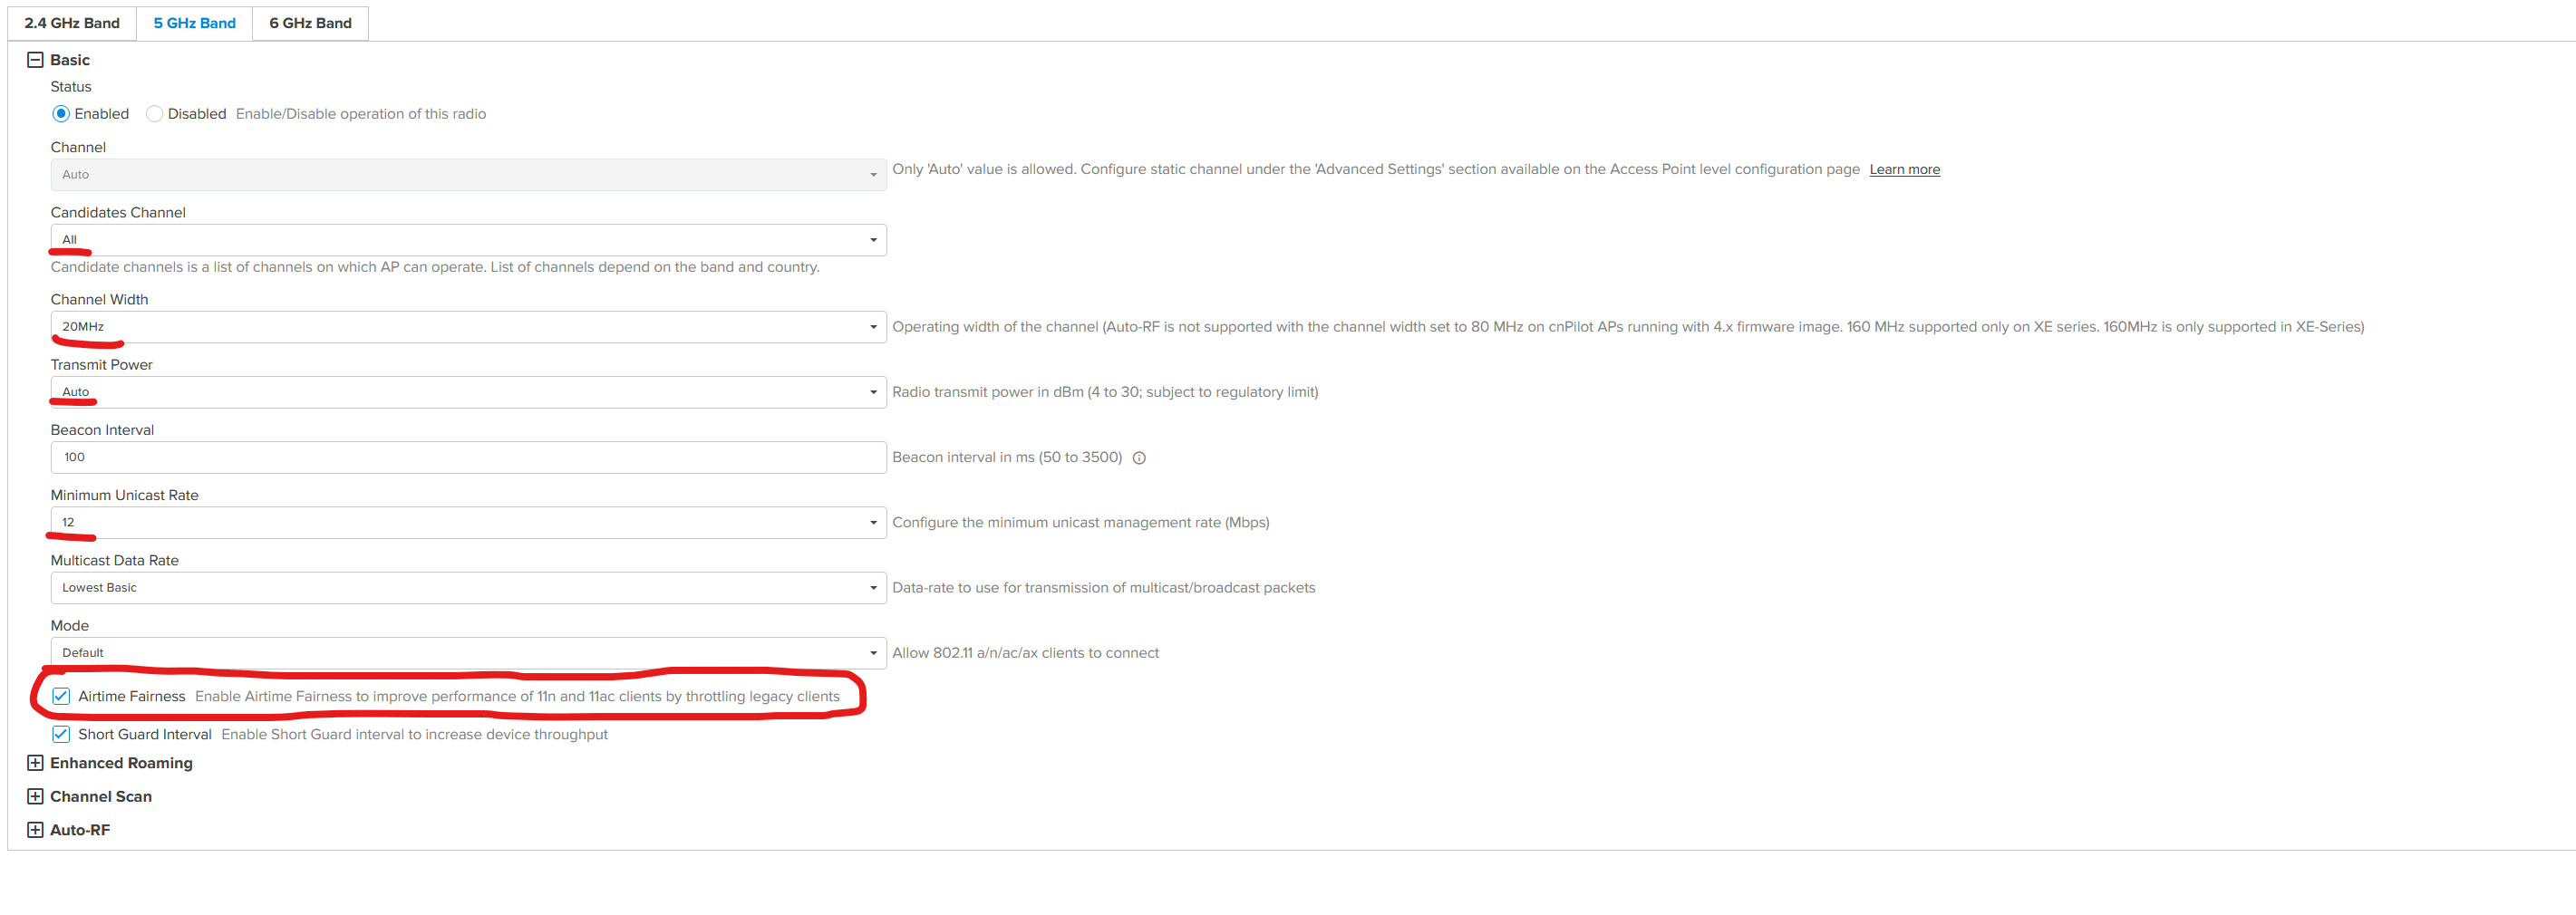
Candidates Channel: To have use of all available channels in the 5GHz spectrum, it is recommended to set this to all. This will help reduce co-channel interference. However, if the APs are being mounted outside then this will need to be set to Prefer DFS.
Channel Width: For best practice this should be set to 20MHz.
Transmit Power: For best practice this should be set to Auto.
Minimum Unicast Rate: Unicast Rate defaults to 6 for 5GHz but for best practice this should be set to 12. This will mean clients that drop below the data rate of 12Mbps will roam to another nearby access point. This helps to stop clients slowing the network down that are transmitting at a low data.
Airtime Fairness: This should be enabled. It allows newer clients (802.11n, ac & ax) to transmit first as they can complete their transmissions in a much quicker time than legacy clients, so are given the right of way.
6GHz
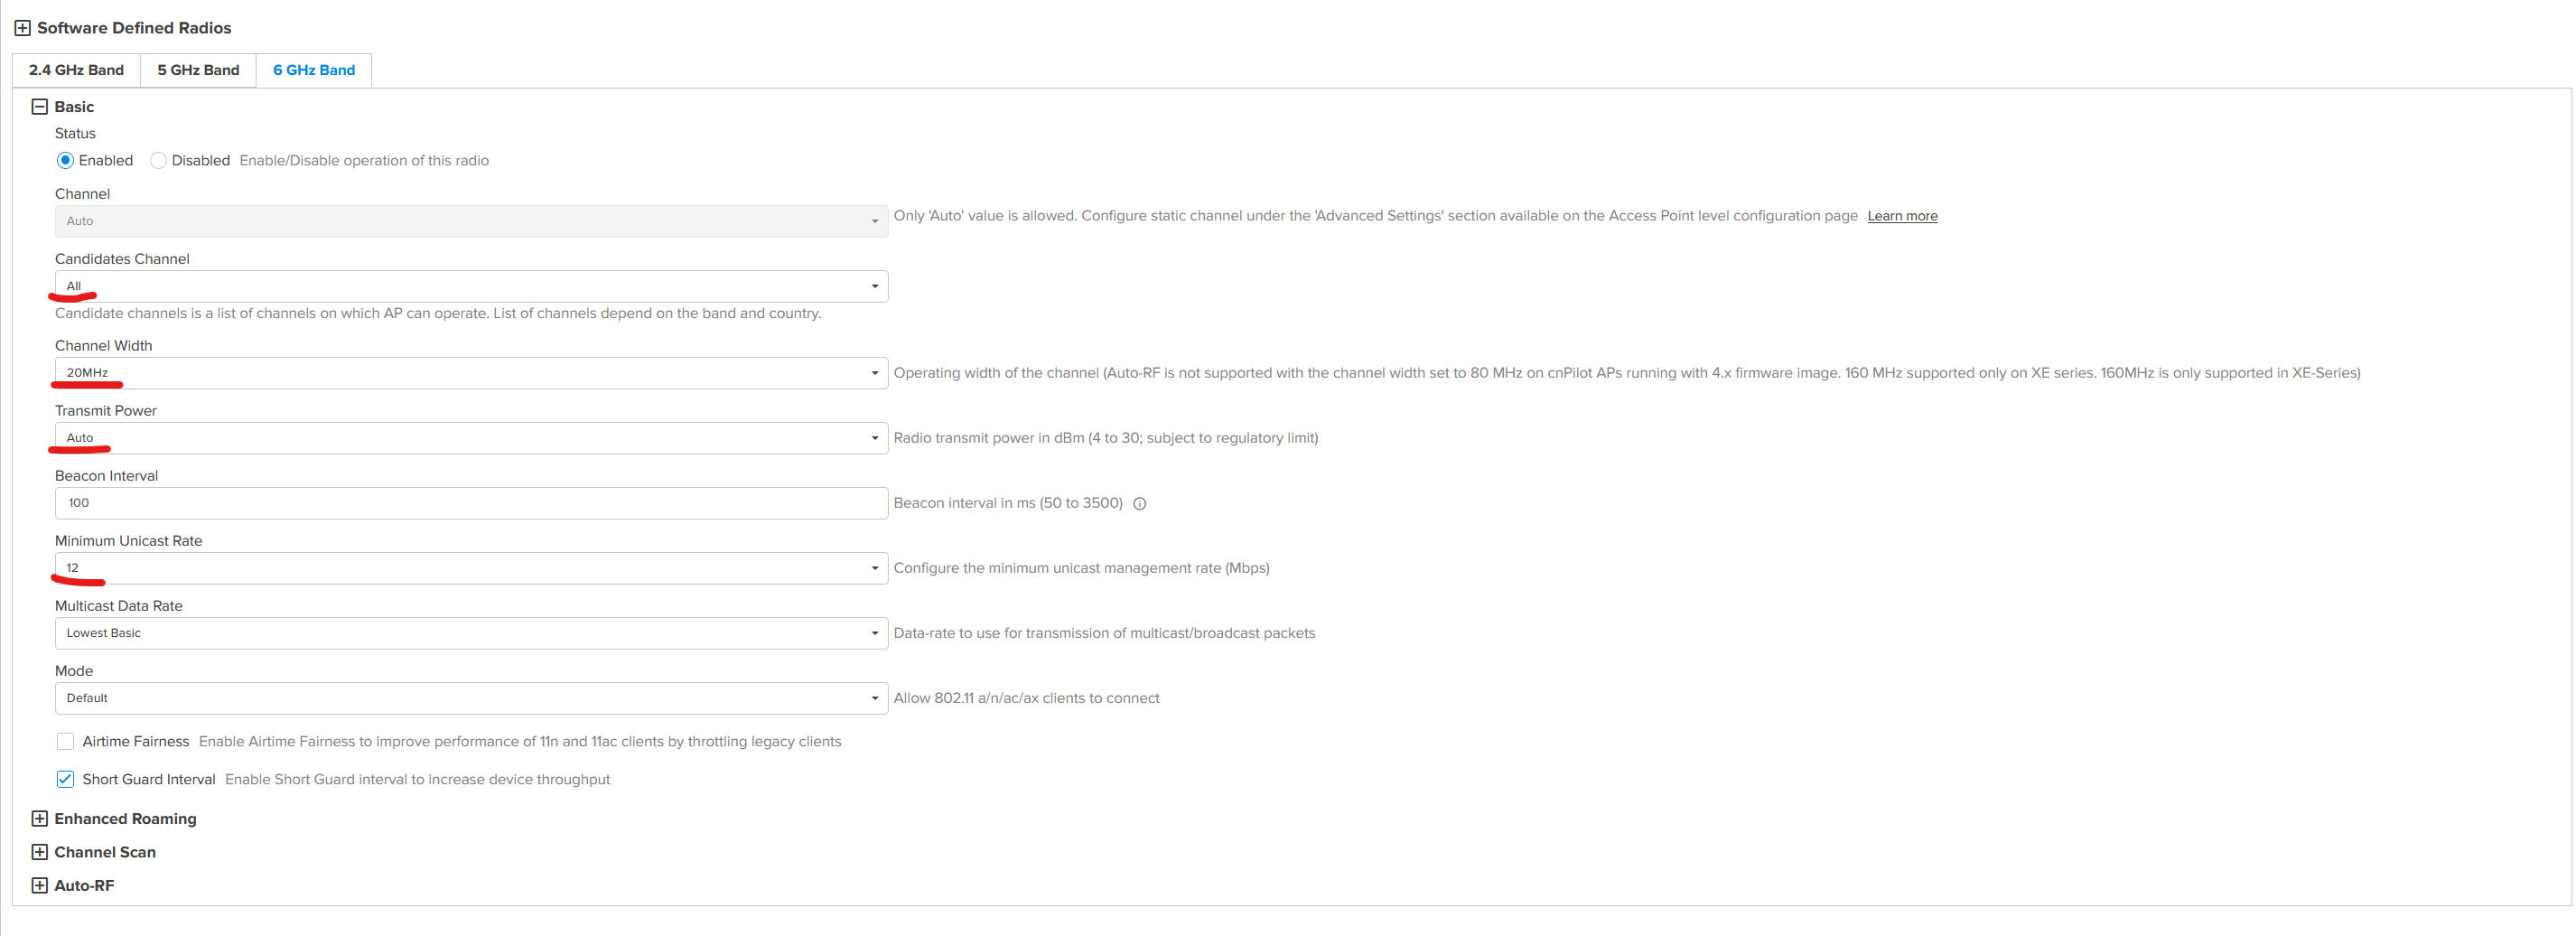
Candidates Channel: This should be set to all.
Channel Width: For best practice this should be set to 20MHz.
Transmit Power: For best practice this should be set to Auto.
Minimum Unicast Rate: Unicast Rate defaults to 6 for 6GHz but for best practice this should be set to 12. This will mean clients that drop below the data rate of 12Mbps will roam to another nearby access point. This helps to stop clients slowing the network down that are transmitting at a low data.
Once these settings have been changed hit save at the bottom of the page.
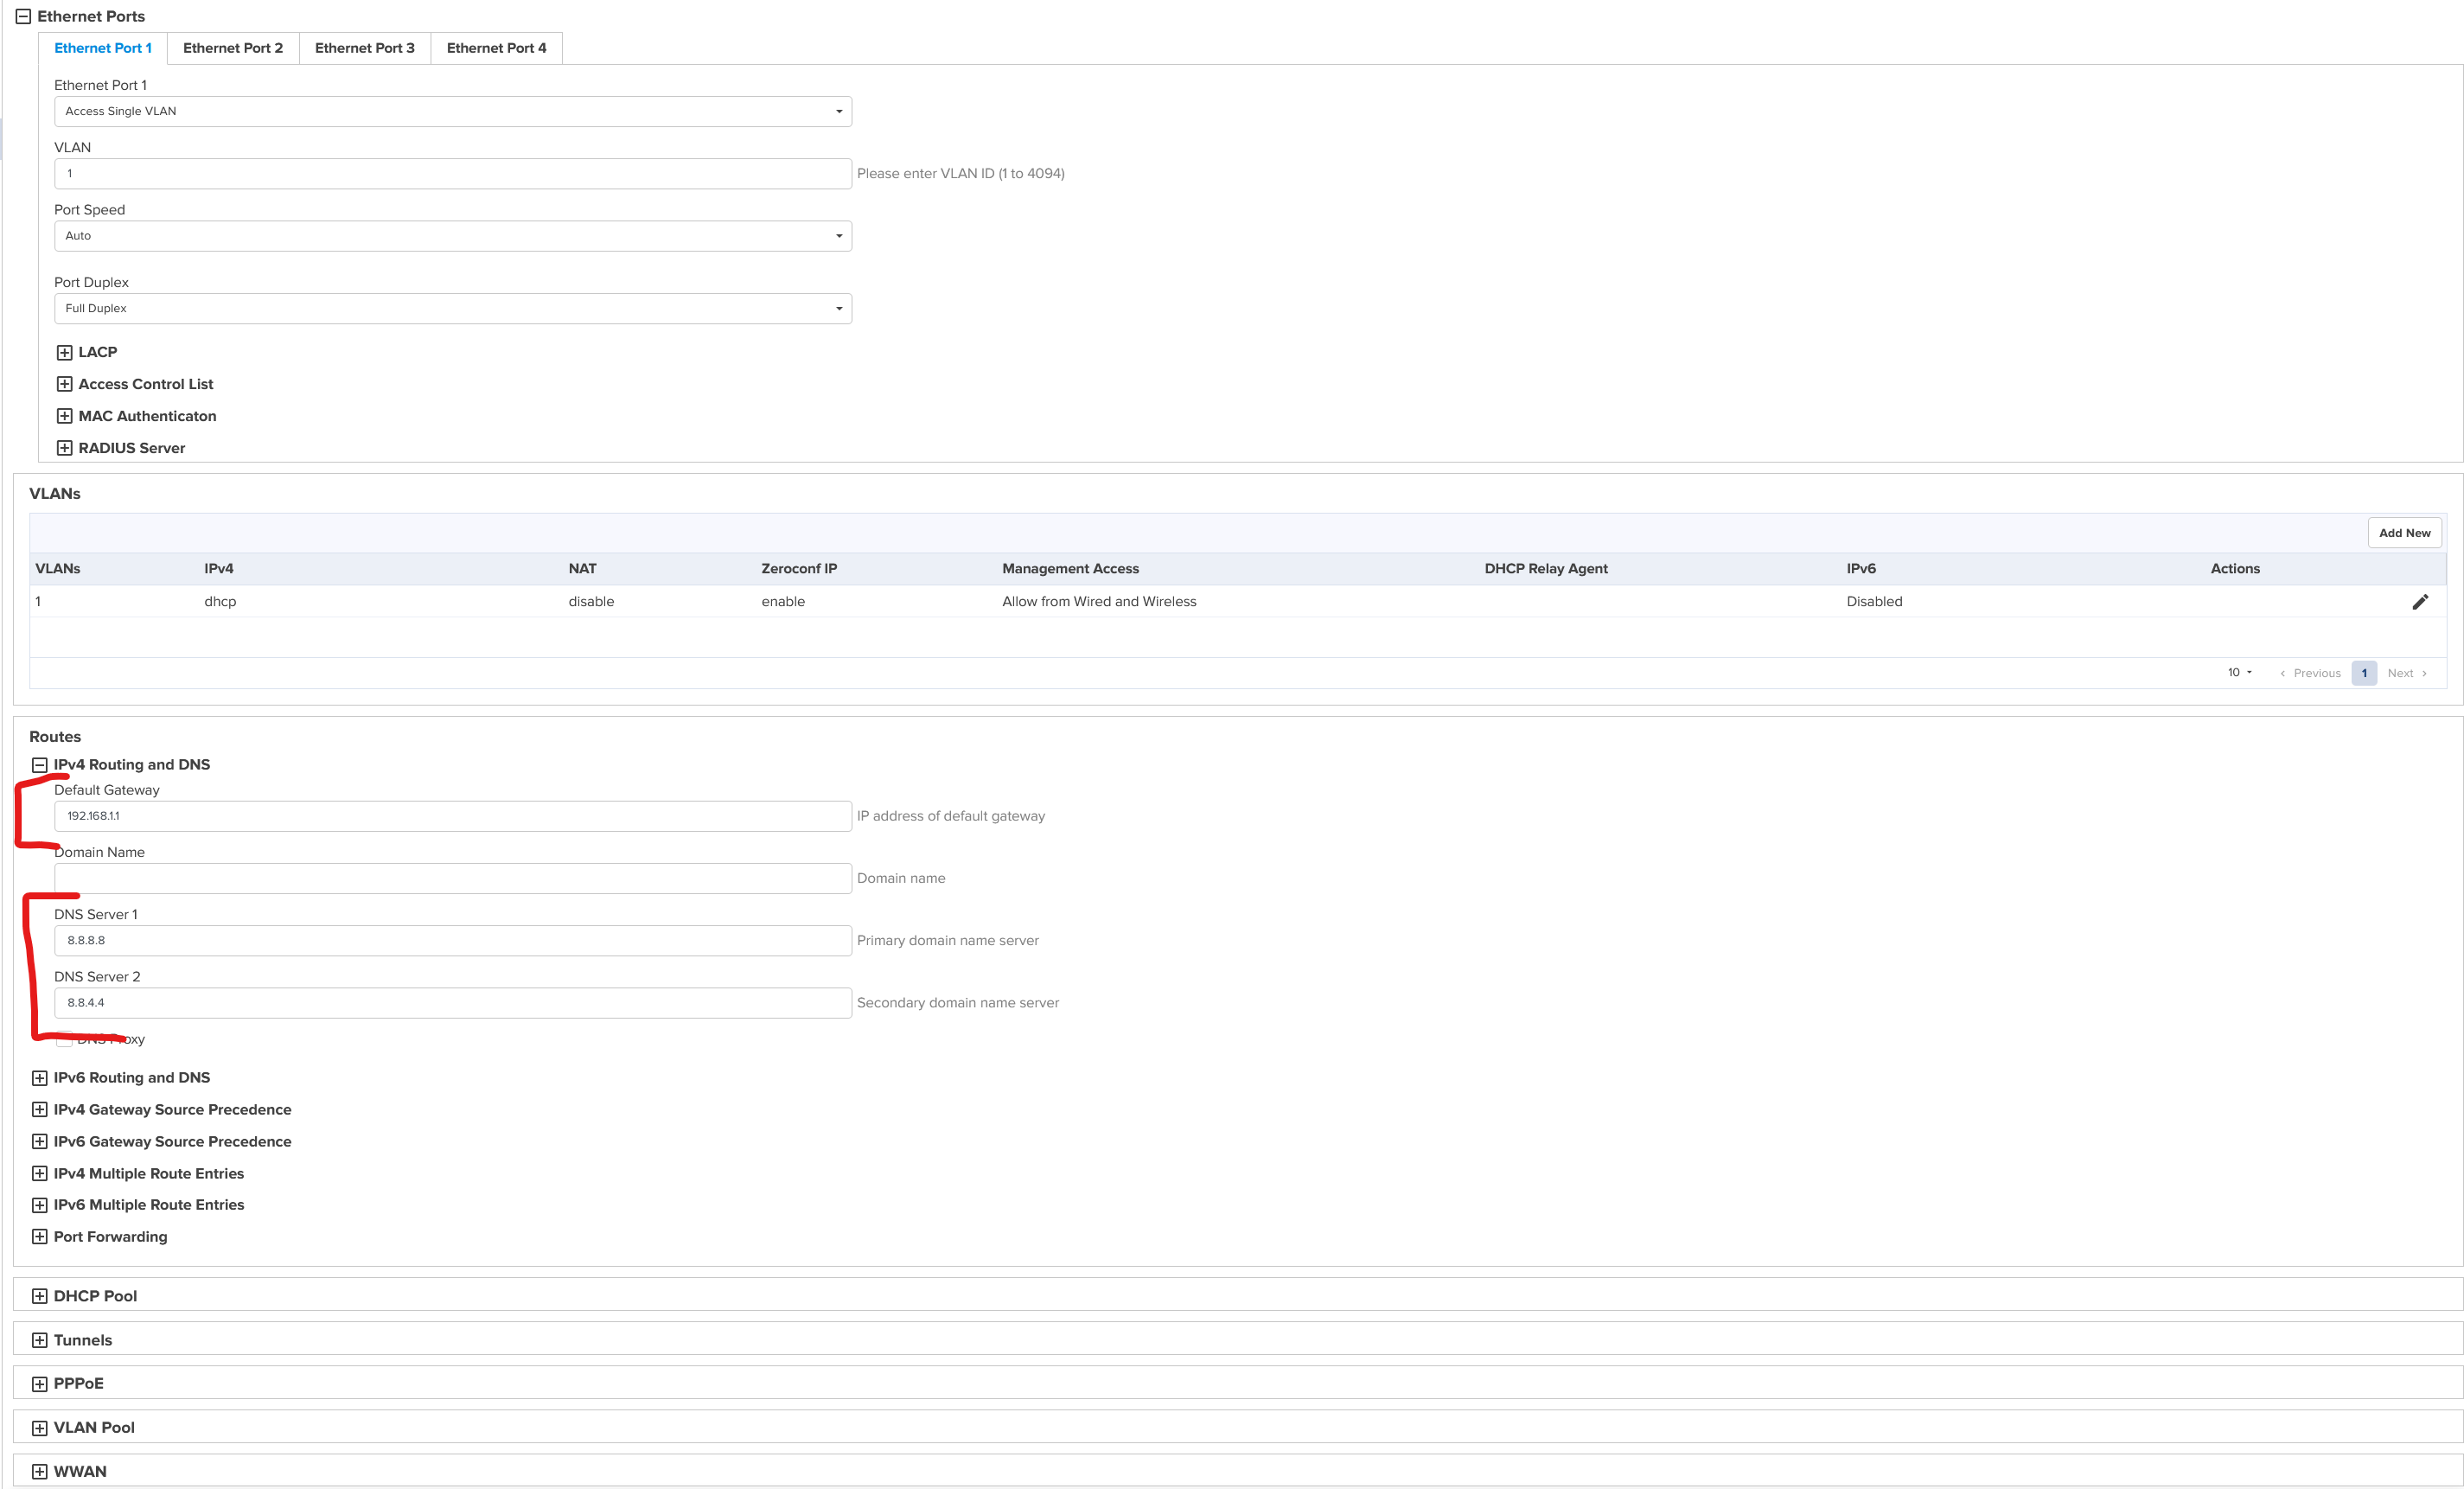
Step 6: Network Settings
The next step is to set the Default Gateway and DNS details.
Default Gateway: This is the IP address of your router in the subnet you are in. e.g. 192.168.1.1
DNS Server 1 & 2: This is the IP address of your Domain Name Server. If you do not have one this can be set to a public DNS server such as Googles DNS server 8.8.8.8 and 8.8.4.4.
Once these settings have been changed, hit save at the bottom of the page.
You have now set up an AP group using best practices.
