cnMaestro - Create a guest SSID with Captive Portal
Purpose:
This guide is to demonstrate how to set up a Guest Access Portal in cnMaestro and how to set up a guest SSID that uses the guest portal.
Pre-requisite:
- Have a cnMaestro account set up (Essentials or X)
- Create an AP Group
How to create the Guest Access portal
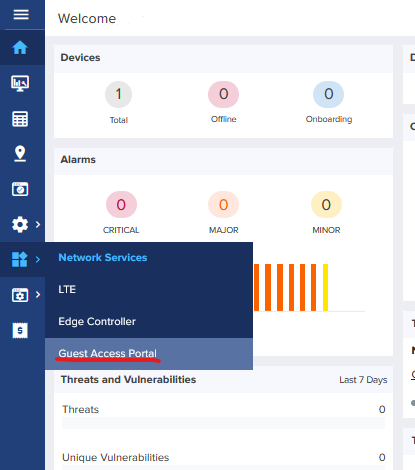
Step 1: On the menu bar on the left hand side of the screen, hover the mouse over the Network Services icon and click Guest Access Portal.
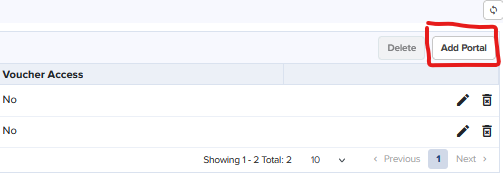
Step 2: At the top right of the Guest Access Portal page, click on the 'Add Portal' button.
Step 3: On the window that pops up, give your Guest Portal a name and click save.
Step 4: A Guest Access Portal will be created and shown on the list of Guest Access Portals. Find the portal you just created and click on the edit pencil item on the right hand side.
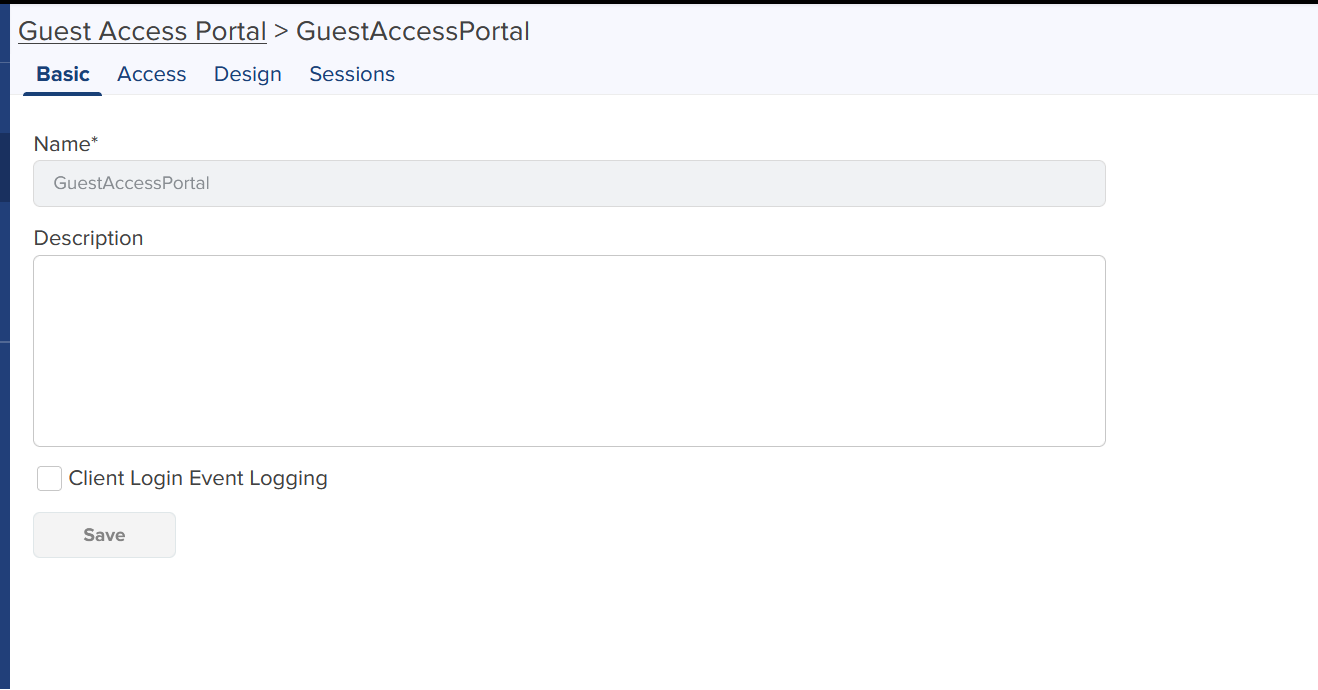
Under the Guest Access Portal settings there are 4 tabs. Basic, Access, Design and Session.
The Basic tab has the name of the portal, a box to write a description and a tick box to enable Client Login Event Logging.
Step 5: The Access tab has further options for configuration. Some of these features are only available with cnMaestroX.
Essentials gives two options:
- Free: This is a portal that gives free access to users.
- Vouchers: The voucher enables a unique code to be created for each user. A plan can be created with rate limits and expiry times and then a voucher token is created for each user which can be exported as CSV or a PDF.
With cnMaestroX you have two extra options:
- Enterprise: Where you can use Microsoft Azure for Guest Authentication
- Paid: This allows you to set up a portal with a payment gateway. An example of this would be a in hotel environment where a free guest access is offered to users but it is rate limited and there is the option to pay for a higher limit.
Step 6: Set up the Access settings for the desired type of Guest Access Portal as below:
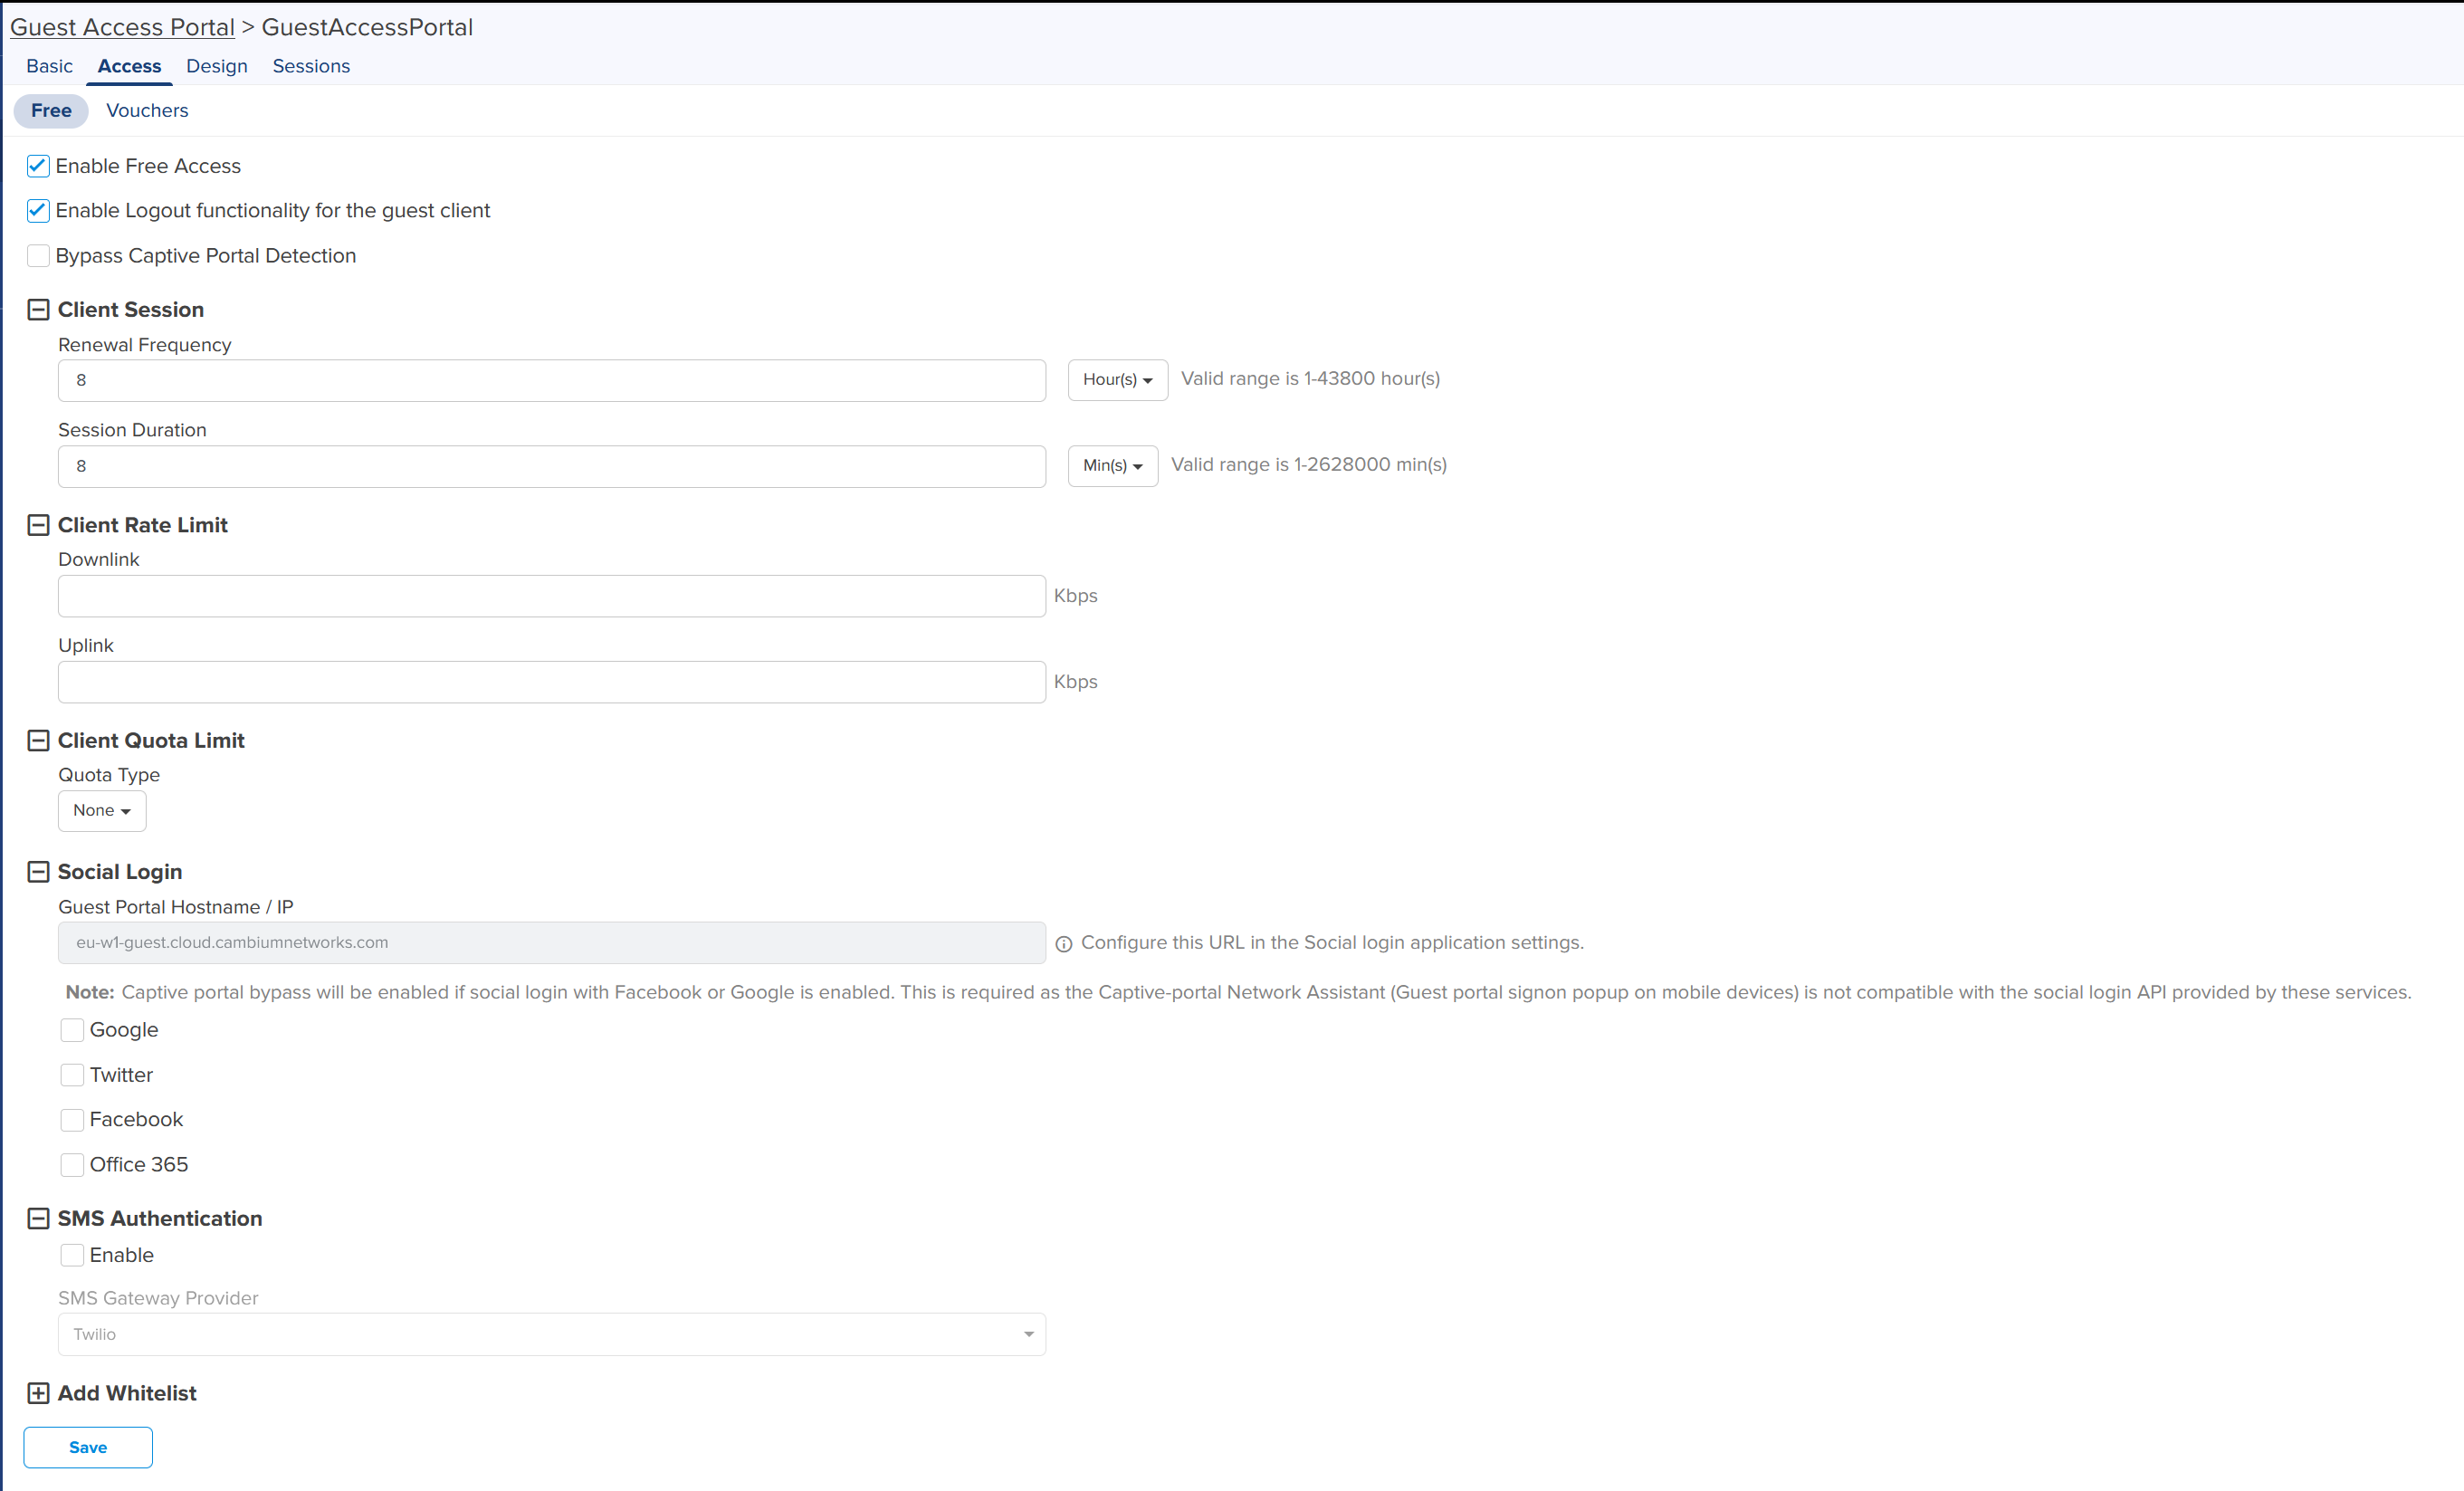
Free Access
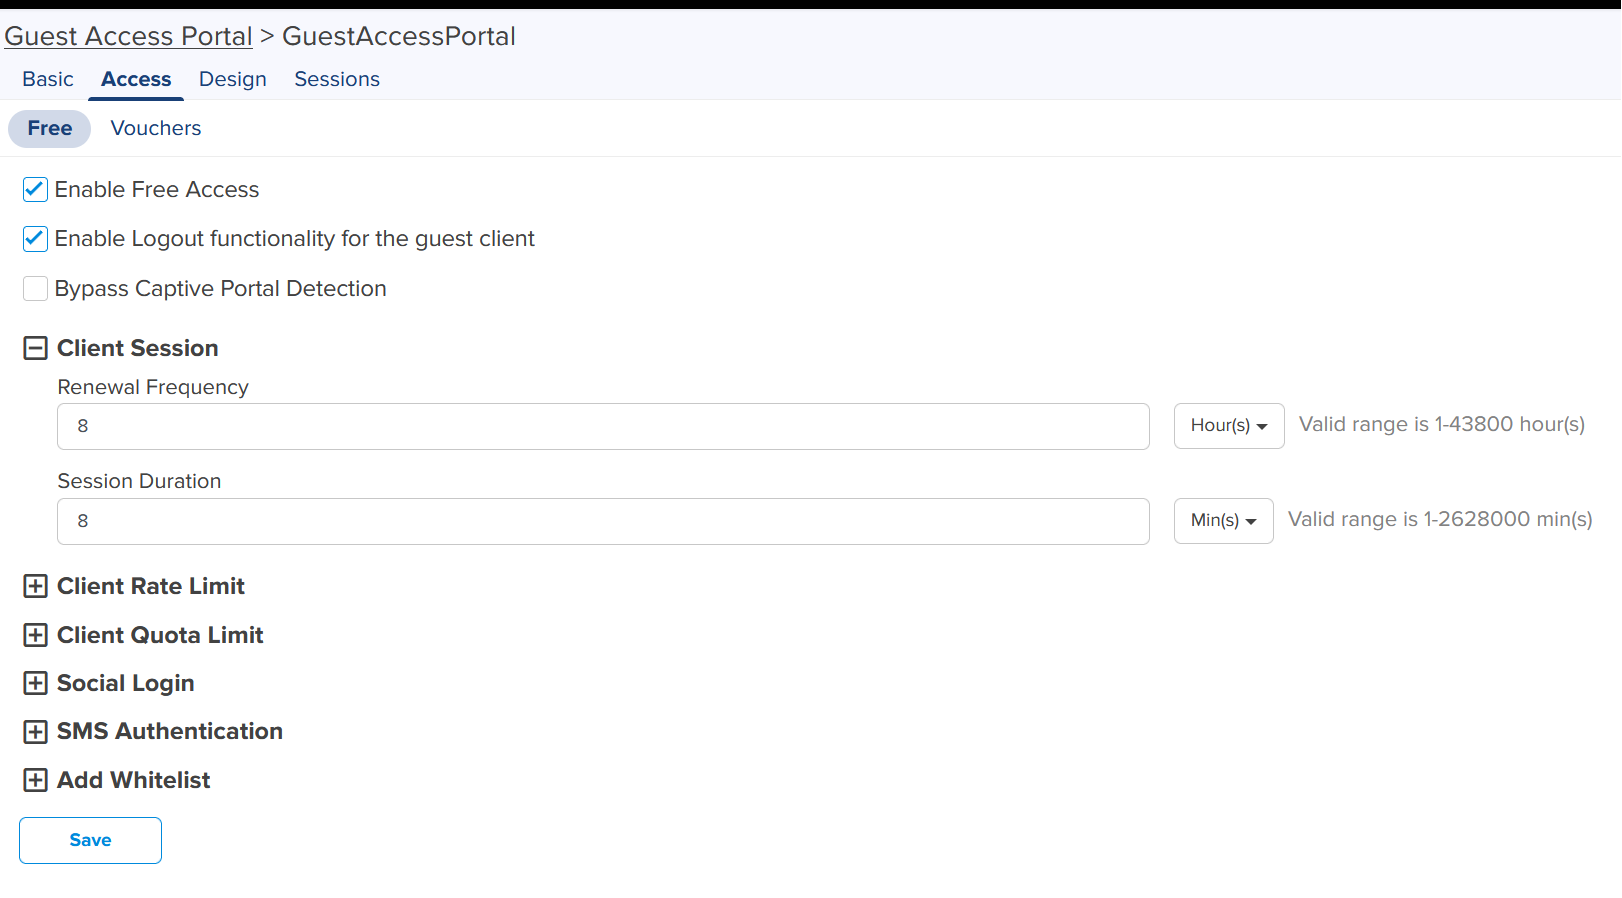
For free access there are a number of configurable options.
- Enable Free Access tick box - This is required to be ticked so the Free Access portal will work.
- Enable Logout functionality for the guest client: This feature enables a logout button on the guest portal to allow users to log out of the Wi-Fi.
- Bypass Captive Portal Detection: This is required to be enabled if you are using social login to authenticate guest users.
- Client Session: Client Session enables you to set a renewal frequency time, this is the time in-between the users session expiring and the time they are allowed to connect again. A session duration time can also be set for anyone who connects. This means after the set period of time the users access will expire and they will be disconnected. Both of these can be set to minutes, hours or days.
- Client Rate Limit: The Client Rate Limit enables the client to be limited to a certain throughput speed when connected to the guess network. This is done in Kbps, so a client could be limited to 1000Kbps which would be 1Mbps.
- Client Quota Limit: This enables a client device to have a limit on the amount of data they are allowed to use in their session. This can be set to Directional, which allows the uplink and downlink speeds to be limited to different amounts or it can be set to total which is the total amount of data the client is limited to using. These can be set to either Megabytes (MB) or Gigabytes (GB).
- Social Login: Social Login gives the option of users logging into the guest network by using their social media accounts. Google, Twitter, Facebook and Office 365 can be used to log in. These require IDs or API keys to work.
- SMS Authentication: This allows SMS text messages to be used to authenticate users for guest access by using their phone number. A one time password is sent to the users phone which they will need to input to gain access to the guest network. (This is a service provided by a 3rd party you will need to register with)
-Add Whitelist: The whitelist allows a list of safe IP addresses or domain names to be added to the guest access. This will mean guest users will be able to get to these IPs and addresses when connected to the guest network.
Once you have configured all your required settings for the free access, click save and continue to the Design tab.
Vouchers
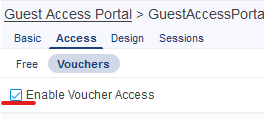
Voucher access enables tokens to be created for individual users so they can connect to the guest Wi-Fi. To use this method make sure the box is ticketed next to enable Voucher Access.
Step A : Tick the box next to enable Voucher Access to enable using Voucher Access.
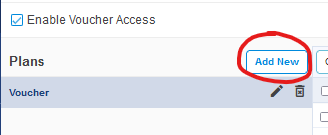
Step B: Click on the Add New button to create a voucher plan.
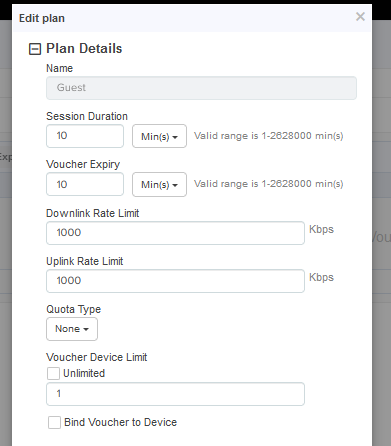
Step C: Configure plan settings. The plan settings are split into 2 sections, there are plan details and voucher design.
Plan Details
Name: This is the name of your plan. Spaces and special characters can not be used in the name, only alphanumeric characters, dashes and underscores. This is a mandatory field.
Session Duration: This is how long each guest session is able to last for. Once this time is up the user will be disconnected. The duration can be set for Minutes, Hours or Days. This is a mandatory field.
Voucher expiry: The voucher expiry is how long the voucher is valid for one it have been created. After this time has expired the voucher will no longer work when entered into the portal. This is also a mandatory field.
Downlink Rate Limit: This enables a cap to be placed on the amount of throughput the user is allowed to use in a downward direction. This is done in Kbps. For example the client device can be limited to a 1000Kbps download speed.
Uplink Rate Limit: This enables a cap to be placed on the amount of throughput the user is allowed to use in an upward direction. This is done in Kbps. For example the client device can be limited to a 1000Kbps upload speed.
Quota Type: This enables a client device to have a limit on the amount of data they are allowed to use in their session. This can be set to directional, which allows the uplink and downlink speeds to be limited to different amounts or it can be set to total which is the total amount of data the client is limited to using. These can be set to wither Megabytes (MB) or Gigabytes (GB).
Voucher Device Limit: This is how many devices can use the same voucher code to connect to the guest Wi-Fi. There is an option to have an unlimited number of devices or a certain number of devices can be specified.
Bind Voucher to Device: This tick box, if enabled, allows the voucher to be tied to a particular device. This will be the first device to connect using this voucher code.
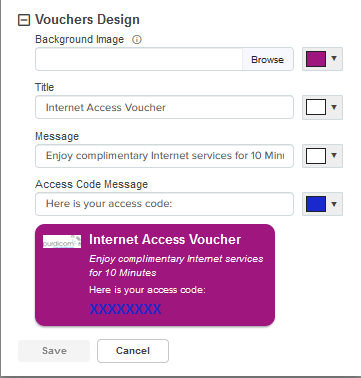
Voucher Design
Background Image: Here you can upload an image such as a company logo which will appear on the voucher next to the text. Next to this box is a colour selection box to choose the background colour of the voucher.
Title: This is the text title of the voucher. The default is 'Internet Access Voucher'. Next to the text field is a box to select the colour of the text for the Title.
Message: This is a text field to allow you to write a message on the voucher. The default is 'Enjoy complimentary Internet services for 1 hr'. Again next to this field is a box to select the text colour.
Access Code Message: This is a text field which allows you to write a message for the access code. The default is 'Here is your access code'. Next to this text field is a box to select the colour of this text.
Once completed click the save button to save the voucher plan. You can have multiple plans which will be shown under the Plans list on the Vouchers page.
Step D: To add a voucher to a plan click on the 'Add Voucher' button at the top of the table.
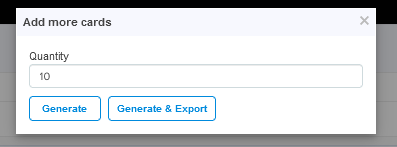
Step E: Enter the number of vouchers you require to be created and click on either Generate or Generate & Export. If you click on Generate & Export the vouchers will be generated and a PDF will be created with a list of the vouchers so they can be printed, cut out and given to users.
The voucher code will then be shown in the table on the vouchers page as shown below
On the left of the table are the voucher ID codes. Next to that is the status of the vouchers, this will tell you if the voucher has bee claimed, unclaimed or if it has expired. The table also shows the creation time, the time the voucher was claimed and the time it expires. There is also an option to delete the voucher.
Along the top of the table are 5 buttons
Card Preview: This will give you a view of what the vouchers look like and give a summary of how many have been created and how many have been claimed.
Export: Export gives you a variety of options for exporting the current page, valid vouchers or all the vouchers as a PDF or as a CSV file.
Add Vouchers: This allows you to add more vouchers to the plan.
Delete selected: You can select vouchers using the tick boxes next to them and delete certain vouchers if required.
Delete expired: This button will delete all the voucher codes which have expired, only leaving valid voucher codes in the list.
Step F: Once finished click on the save button at the bottom of the page and continue to the Design tab.
NOTE: You can have both the Free Access and Voucher Access enabled at the same time. This will give the guest user the option to select which one on the portal page when they first connect. This can be used in instances where the Free Access option is limited or restricted and a voucher which could be obtained from reception will provide guest access that is not limited or restricted.
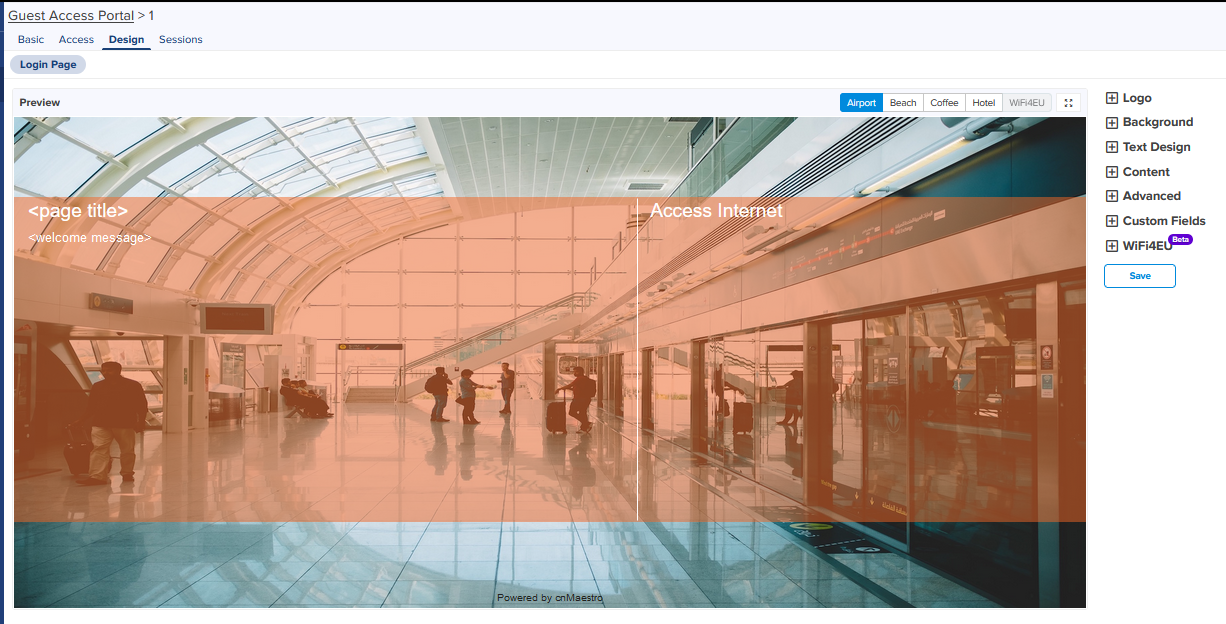
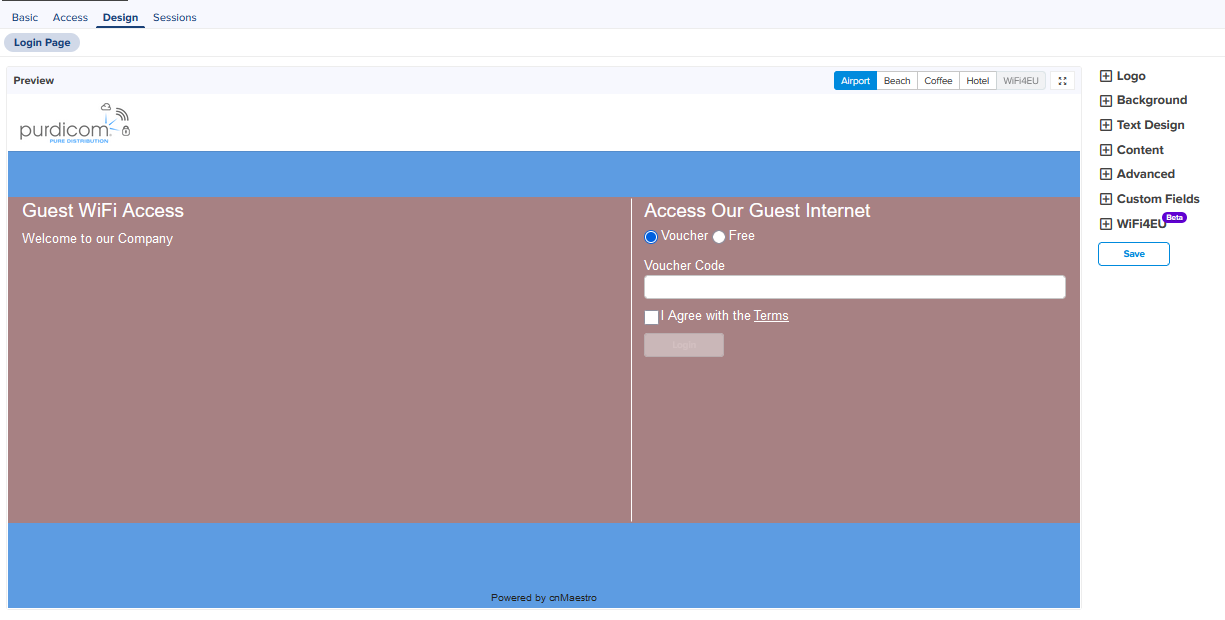
Step 7: The Design tab - This tab is where you can design and build the portal the user will see when they connect to the guest SSID. When you first go onto this tab you are shown a preview of the login page and some options to the right hand side which can be expanded. There are 4 preset options to chose from which can be edited.
Step 8: Choose one of the 4 preset option and then use the menus on the right had side to customize the page to your specification.
Configuration items
Logo: The logo option allows you to upload a company logo to be shown on the page. It will be located on a banner at the top of the page. There is also a box here to choose the colour of the logo background. This is the banner at the top of the page.
Background: Here are the settings for the background of the page. A colour can be selected for the background or an image can be uploaded for the background. There is the option to hide the background image if a colour is just want and repeat the background if the image is small and you want to repeat it. The placement of the background can be adjusted here as well and the background colour for the content area can be selected.
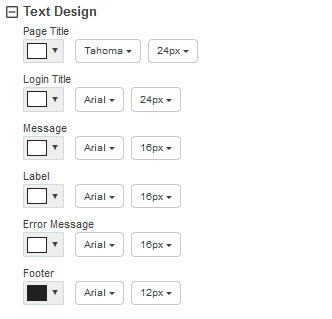
Text Design: Text design allows you to choose the colour of the different text fields on the page, you can choose from 4 fonts and the side of each text field can be changed. For example titles can be different colours and sizes from message text.
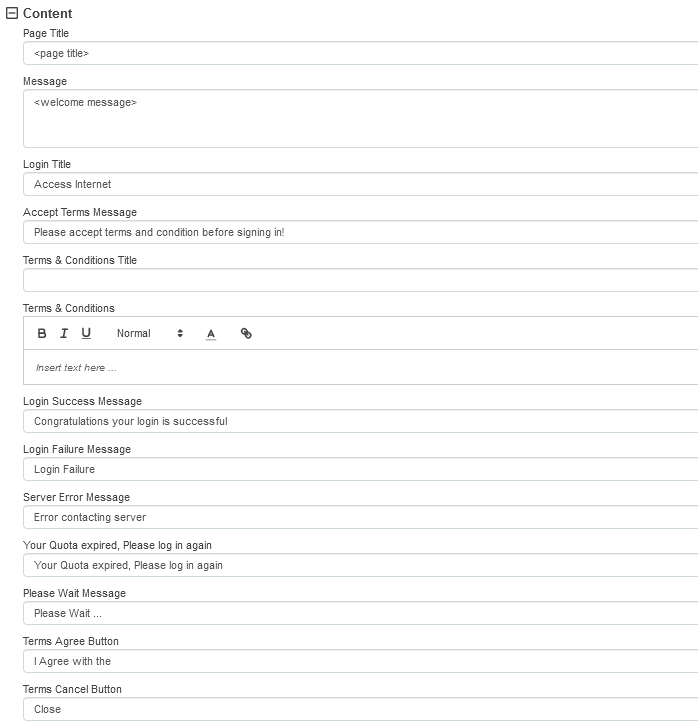
Content: Content is where the text fields can be filled out for the various sections on the page. Some of these fields are already populated with default text. These can be changed to suit what is required.
Advanced: Advanced allows you to upload a CSS file to use a custom design for the portal. A Sample CSS file can be downloaded to use as a template.
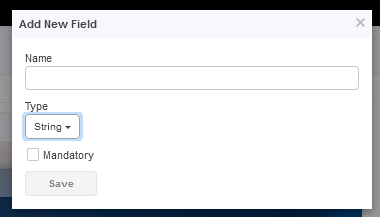
Custom Fields: Custom fields allows you to add your own fields to the portal. To do this Free Access must be enabled. Click 'Add New' on the table and another menu will open. Here a name for the field is required and the type of field. For example Name, Number, email or phone number. There is also the option to make the field mandatory, so it has to be filled in by the user.
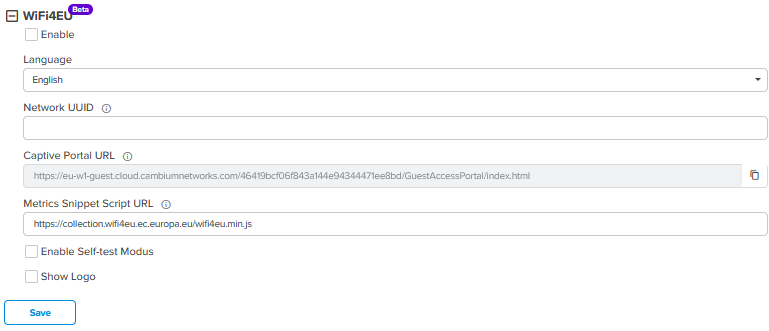
Wifi4EU: These are setting that can be configured for the EU free public Wi-Fi initiative. A Network Universally Unique Identifier is required for this. There is a tick box to enable this which will change the design of the portal.
Step 9: Once the settings have been configured to your preference click save. The preview will then refresh and show what has been configured.
Step 10: Next head to the sessions page. Here nothing needs to be configured however this is where information for connected guests is shown. There are 3 tabs at the top of the page:
Sessions and Login Events: Client sessions show any clients that are connected to the Wi-Fi using the Guest Access Portal and what voucher code they are using. The login events will show up if enabled on the Basic tab of the Guest Access Portal settings.
Paid Transactions: This will show any users that have paid to access the Wi-Fi using services like PayPal etc. (cnMaestroX)
Users: This will show any user sessions through using Microsoft Azure. (cnMaestroX)
The Guest Access Portal has now been created. The next task is to add it to the SSID.
Creating the Guest SSID and adding the Gust Access Portal
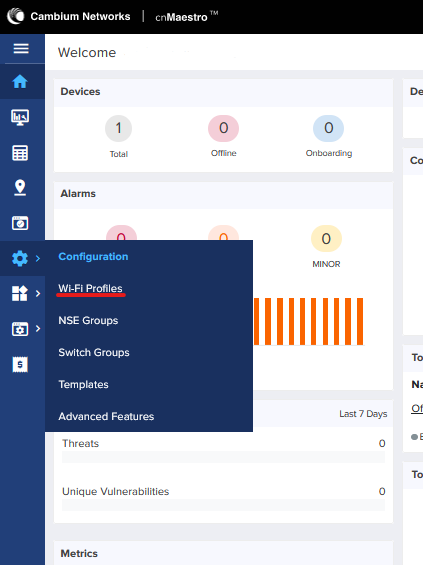
Step 1: On the menu bar on the left hand side of the screen, hover your mouse over the configuration cog icon and the Configuration menu will expand. Go to Wi-Fi Profiles.
Step 2: At the top of the Wi-Fi profiles page click on WLANs.
Step 3: On the WLANs page, click on the 'Add' button located on the top of the WLAN tables to add a new WLAN.
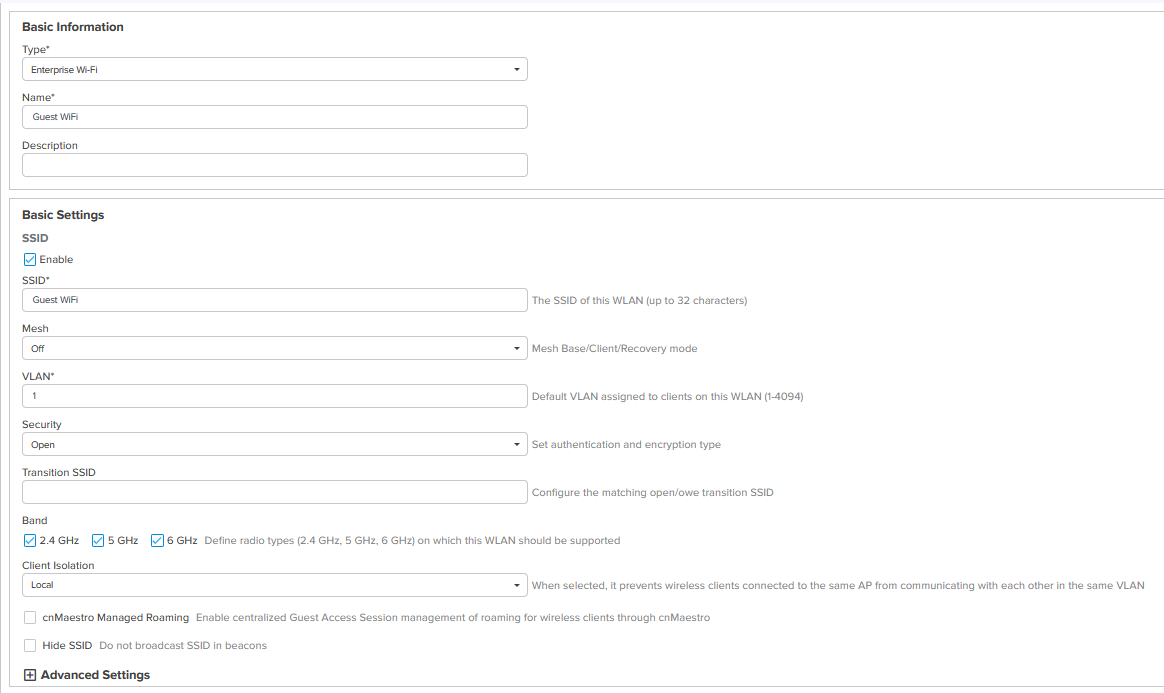
Step 4: Configure your required SSID settings under the WLAN setting tab. Here the WLAN should be given an appropriate name. This will also fill in the SSID box, change this if a different SSID broadcast name is required. If you have a Guest VLAN, this is where this should be added to the WLAN. You can also pick your security authentication type. Since this is a guest network with a portal this has been left as Open.
You can also set the frequency bands the guest network is broadcast on can also be set by checking the check boxes next to the 3 frequencies. 2.4GHz, 5GHz and 6GHz.
Sine this is a guest network it would also be recommended to have client Isolation in place to stop clients from talking to each other on the network.
Once configured to your requires hit save at the bottom of the page.
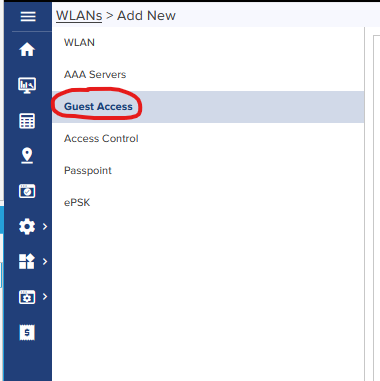
Step 5: Next go to the Guest Access tab on the left hand side.
Step 6: Check the Enable box at the top of the guest access settings and for Portal Mode ensure you have selected cnMaestro.
Step 7: A drop down box will now appear, from here select the name of the Guest Access Portal you created previously.
Step 8: Click the save button at the bottom of the page.
The Guest SSID has now been created.
Step 9: Go to the AP group you wish to deploy the guest SSID to and add the WLAN to the list of WLANs for that group and click save.
The WLAN will now be pushed out to the AP in the AP group.
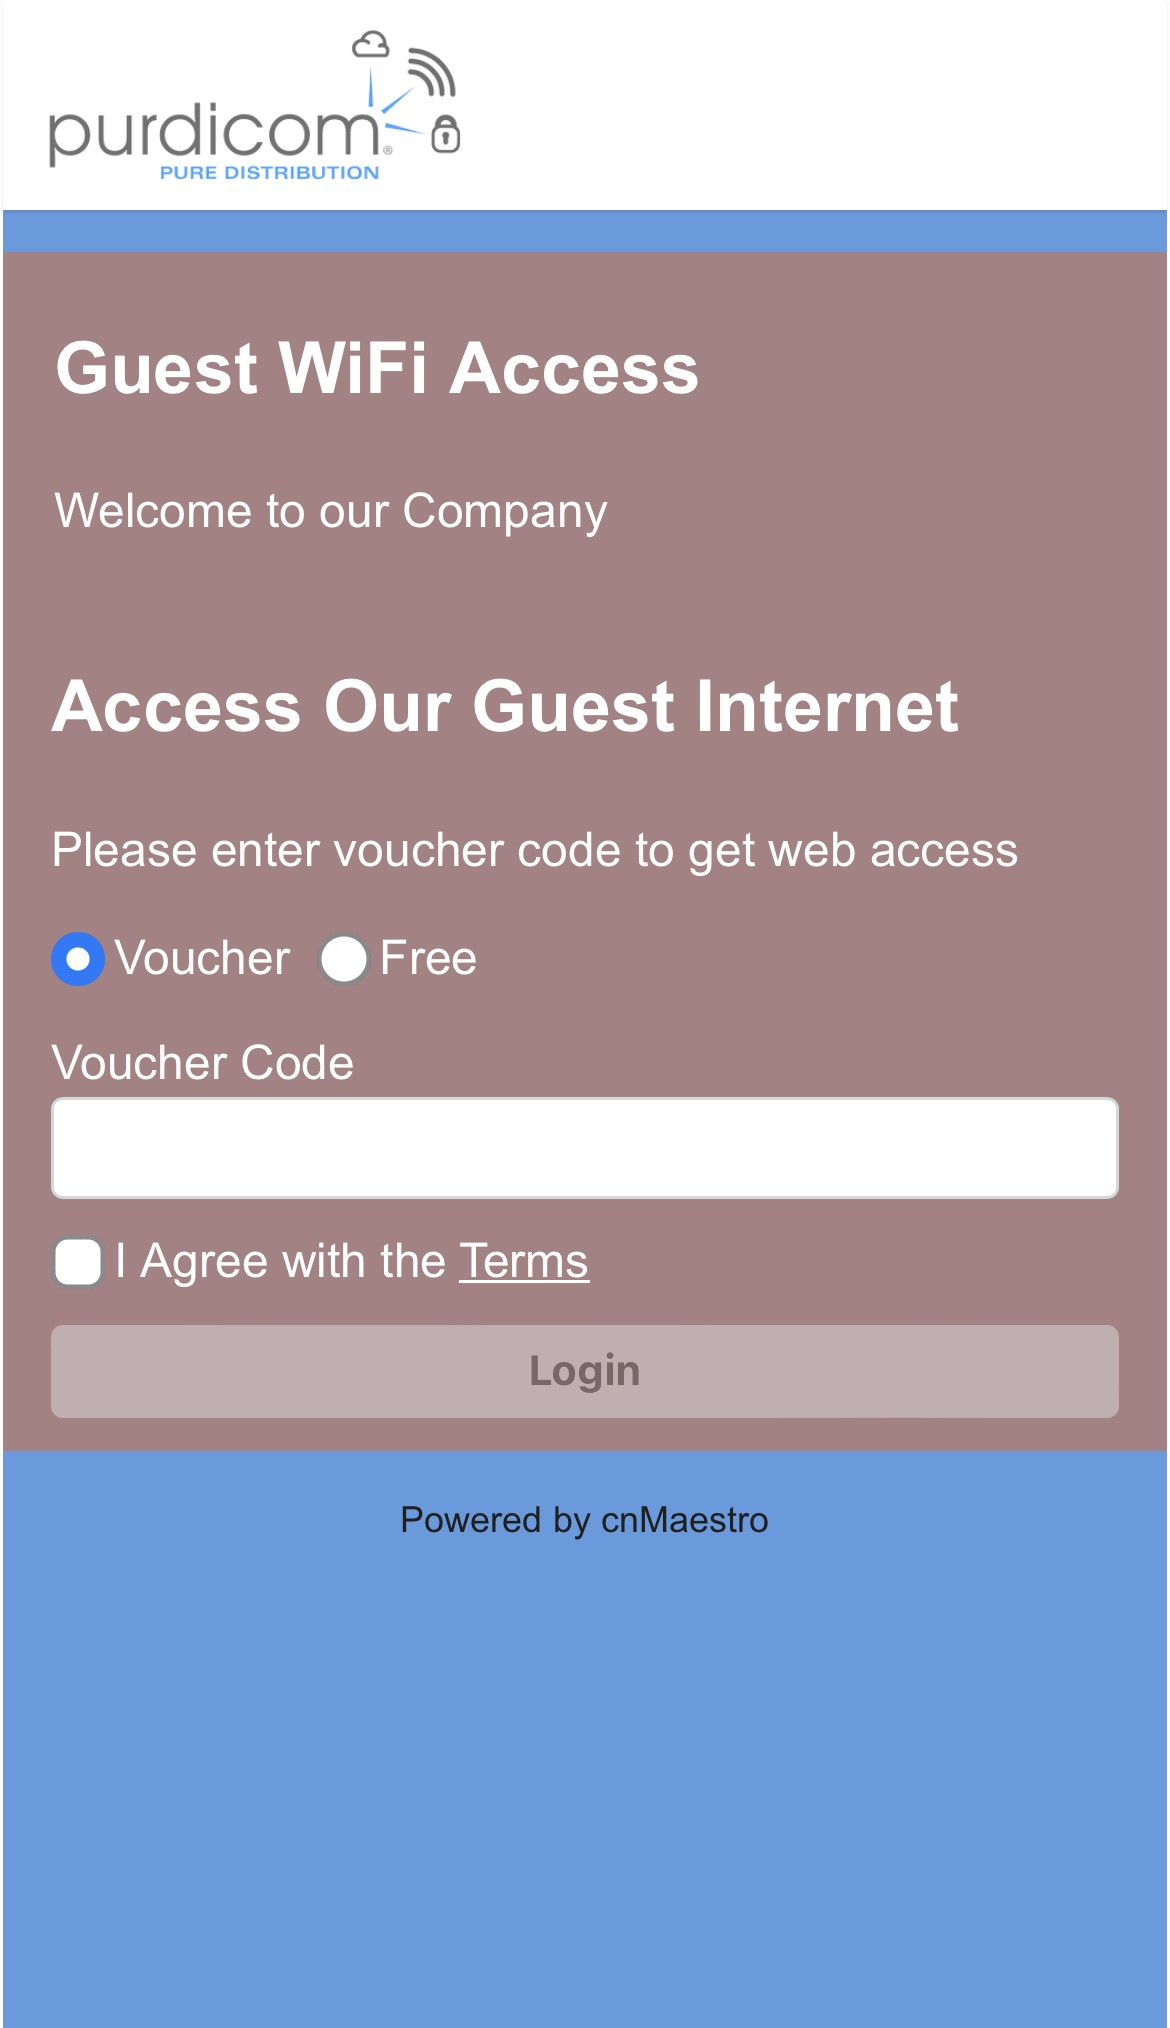
Step 10: Check to make sure the new Guest SSID is visible. If you connect to it a portal will appear with the configured options to access the guest network.
